
 AADs
AADs  Containers
  Canopies
  Used Rigs
  Used Rig Components
  Full Face Helmets
  Open Face Helmets
  Helmet Spares
  Helmet Accessories
  Visual Altimeters
  Audible Altimeters
  Altimeter Mounts
  Altimeter Spares
  Packing
  Gloves & Goggles
  Knives
  Logbooks
  Bags & Cases
  Camera
  Rigging Tools
  Rigging Materials
  End of Season 2025 Clearance
  Used Gear
  Clearance Stock
  Gift Ideas
  Rentals
  Rigs
Rigs  AAD Spares
  Container Spares
  D-Bags & Freebags
  Main & Reserve Pilot Chutes
  Lanyards
  Risers & Toggles
  Cutaway & Reserve Handles
  Bungees & Elastics
  Loops & Links
  Container Accessories
  Main Canopies
  Reserve Canopies
  Linesets
  Canopy Spares
  Canopy Accessories
  Jumpsuits
 ") Formation (FS)
Formation (FS) ") Freefly (FF)
Freefly (FF)  Swoop Shorts
  Working
  Camera
  Tunnel
  Helmets
  Altimeters
  Accessories
  Clothing
  Rigging
  Line & Cable
  Tapes
Tapes  Webbing
  Hardware
  Threads
  Fabrics & Netting
  Elastic & Velcro
  Sale
Sale  Services
  Winter Jumping
  DZ / Sub Dealer
 If you own your rig, or you’re using a piece of kit on a regular basis, for example renting a rig, make sure you know how to take care of your gear, so it can look after you. Your rigger can do a thorough check and likely does all of these at every re-pack, but is it enough to only be done every 6 months?
Have a system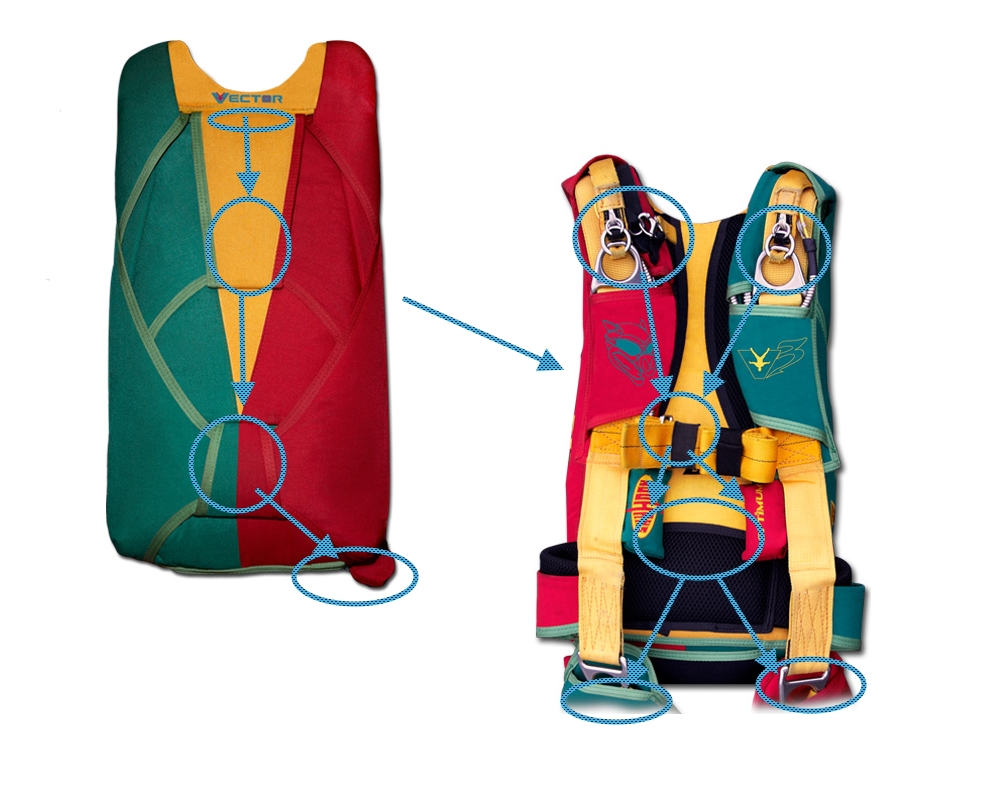
Whenever you perform checks on your gear, getting kitted up in the morning, or, come to think of it, with most things in skydiving (packing, dirt-diving, flightline checking, making a cup of tea), it’s safest and most helpful to have a system that you follow every single time. This means you’ll be less likely to miss anything that could potentially be a problem.
Different people will have a different system that works for them; find what makes sense and works for you. As long as you check everything in the same order each time, that’s what matters.
How often?
As the title suggests, we recommend doing these checks monthly based on information gathered from the top manufacturers (UPT, Sunpath, Parachute Systems, Performance Designs, Aerodyne). UPT also say that you should pay special attention to your 3 rings system at least every 3 months (disassemble, flex, inspect); these guys should know, they designed it.
Monthly maintenance is a bit more thorough than your regular morning checks and other gear checks, and works alongside them - not replacing them. If you don’t currently do any gear checks, start now! Have a chat to an instructor about what to check on your gear and when; bear in mind that everyone will do their checks a bit differently to someone else, so ask a few people to pick the bits that you like best.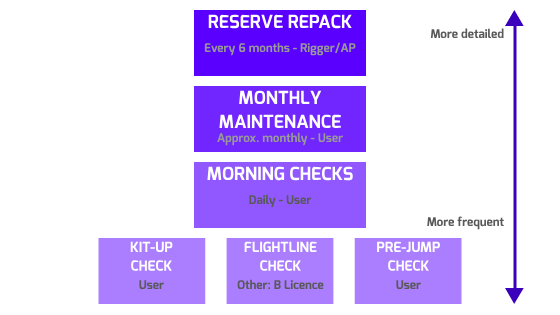
Monthly Checks
Monthly checks should be fairly similar to your morning checks, but these provide a good opportunity to spend a bit more time with your kit to make sure it’s as good as it should be. These checks are also a good idea if looking at a potential purchase, if it’s been a while since the rig was jumped, or if it was last jumped in unfavourable conditions (e.g. wet, dirty, sandy). Monthly checks also provide you with the opportunity to make sure your kit is in good working order, and to give your rig a bit of TLC. Do this on a non-jumping day, or when you’re not in a rush to get jumping, at home or at the DZ (having others around means you can ask for their opinion if you come across something you’re not sure about).
Take your time, double check if necessary, and always ask questions. The only silly question is the one you don’t ask.
Container
Harness and container stitching
Main Canopy
D-bag, bridle, kill line, PC, handle
Container
BOC condition (Bottom Of Container)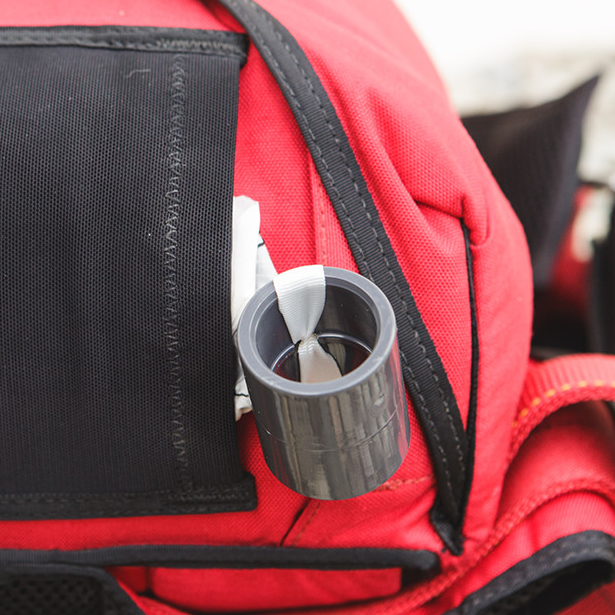
Check the elasticity of the pilot chute pocket - is it tight enough? Has it been stretched? Is the elastic starting to break? Tighter fitting mains means there is less room for the pilot chute and the BOC can end up being tighter than originally designed. Sliding in landings, packing, scraping on the floor can all contribute to extra wear. Smaller fitting mains means that the BOC might not be tight enough - this can cause premature openings. Is the bridle protected and the handle sturdy in place?
Main loop (length and condition)
Try to push the pin out using the pad of your thumb. The rule I follow is that the pin should hurt your thumb before it moves anywhere. Ask for a second opinion if you’re not sure. Loose main pins can potentially be fatal for yourself and the whole aircraft if it gets knocked on exit. Take the main out to have a better look.
The closing loop should look like new. If there’s any question, there’s no question - change it. XDream stores offer free closing loops if you bring in your old one as long as it’s being changed at the correct time (if your closing loop has broken threads, for example, this should have been changed a long time ago). A good condition, sturdy, tight main closing loop isn’t much to sort out - and you will save lives.
Reserve pin and loop
Take a few extra moments to study the reserve pin - is it smooth, is it in far enough, is it set up correctly? The loops should look as new - no broken threads, clean, and tight enough that the pin doesn’t slip. Take care with this part, ask a rigger, advanced packer, or someone with more experience to check anything if you’re not sure.
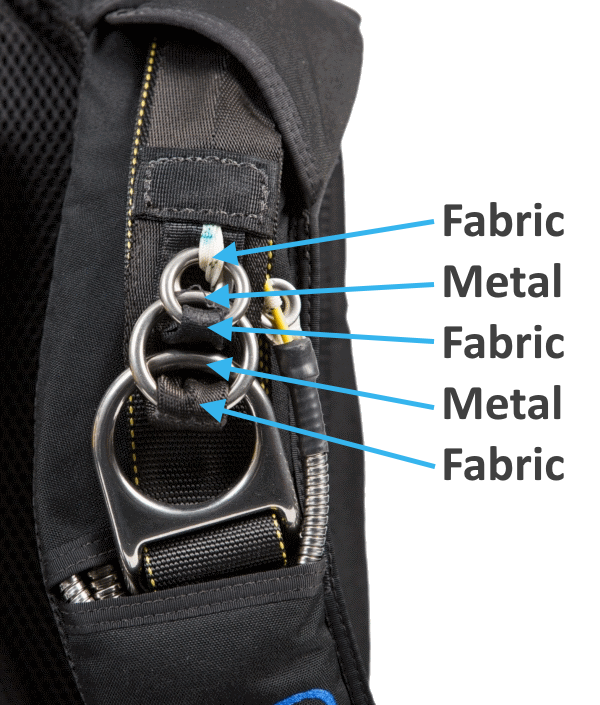 3 ring assembly
Disconnent the RSL and release the 3 ring system using the cutaway handle. Pull the cables completely free from the housing and use a dust cloth and appropriate lubrication to clean the teflon cables (ask your AP or rigger!).
With the released 3 rings; pull and twist each ring to loosen the material holding it. This will ensure the material is supple during cutaway. Inspect the loops and material and stitching for signs of wear. Make sure your risers don't swap over or get twisted so they reattach correctly.
When reassembling the 3 rings, double and triple check they are assembled correctly (both sides). If the cable needs to go through a Collins lanyard (RSL/Skyhook), make sure this is done correctly. Reconnect RSL if desired.
Harness and container stitching
Again, be methodical. Work your way through a systematic approach and check all the stitching on the outside of the container, inside the container (where practical), check the harness stitching, front and back. Check any loose threads with someone with more experience. Keep an eye out for any grazes or holes in the material itself.
Elastics on leg and chest straps
As it says, check they’re there, and check they look good and are tight enough to hold excess material.
Hook knife
Check all of them if you have more. Is it still easily accessible, is it firmly attached but able to be released when necessary? (Check with gloves on, and with the rig on.) Is there a blade, and is it sharp? (Please, be careful.)
Hard housing.png)
The hard housing, or anaconda housing, is where the teflon/spectra/metal cables from your two emergency handles disappear into the harness/container. These shouldn’t move if you pull on them as they are tacked in place, so hold onto the housing and see if it moves if you pull it up and down, both sides.
---
If you have the time, it's worth doing these extra checks on your canopy.
Main canopy
Risers
Check the front and back of rear and front risers looking at the material and stitching, and then the loops of the 3 ring system. Include checking the toggles, the brake line hoop, excess loops, and toggle stows.
Soft links
Or hard links if you have these instead. We do recommend soft links, or ‘slinks’ as they're more commonly known, if appropriate - they’re stronger and have fewer issues that can arise from using them.
Check the links are attached and routed correctly and that they’re all in good condition.
 Slider and grommets
Check the top and bottom of the slider material and stitching. If it’s collapsible, check the lines used to collapse it, and have a keen eye on signs of wear, especially around the mouth and tunnel of the lines used to collapse the slider.
Check each grommet on the top and bottom of the slider. Run a finger around the edge and inside to make sure there are no catches, and keep an eye on the plastic spacers under the grommets.
Lines; sequence, condition, trim
Wearing the rig on your shoulders facing the canopy (ideally hung up by the tail) hold out the lines to check the sequence is correct from each riser, i.e. no crossovers. Double check. Move up and down the lines checking the length for any threads out of place, check the attachment points that they’re bar-tacked into place as well as knotted. Remember the brake lines too. The line trim (length/stretch/shrink of the lines) is easiest to check when packing; when the lines are over your shoulder and you’re separating the line groups to flake the canopy, take a look at the A lines, B lines, C lines, and D lines in their groups and where they sit next to each other. Depending on the line type, normally they should all be on the same level to one another in the same group.
Canopy
Take your time to look at the material up and down each cell, working across the bottom, then the top. Wear is more likely to appear on the top skin of the centre cell due to packing, sweat, and pinching of the material around the slider and kill line.
Having a backlight can be really helpful during this part to spot holes. If do you see anything, make a note of where it is, show someone and ask for advice - if the hole is big enough, it may require a patch.
There are other tests that can be done on canopies to test the strength and porosity of the material - ask your rigger for advice.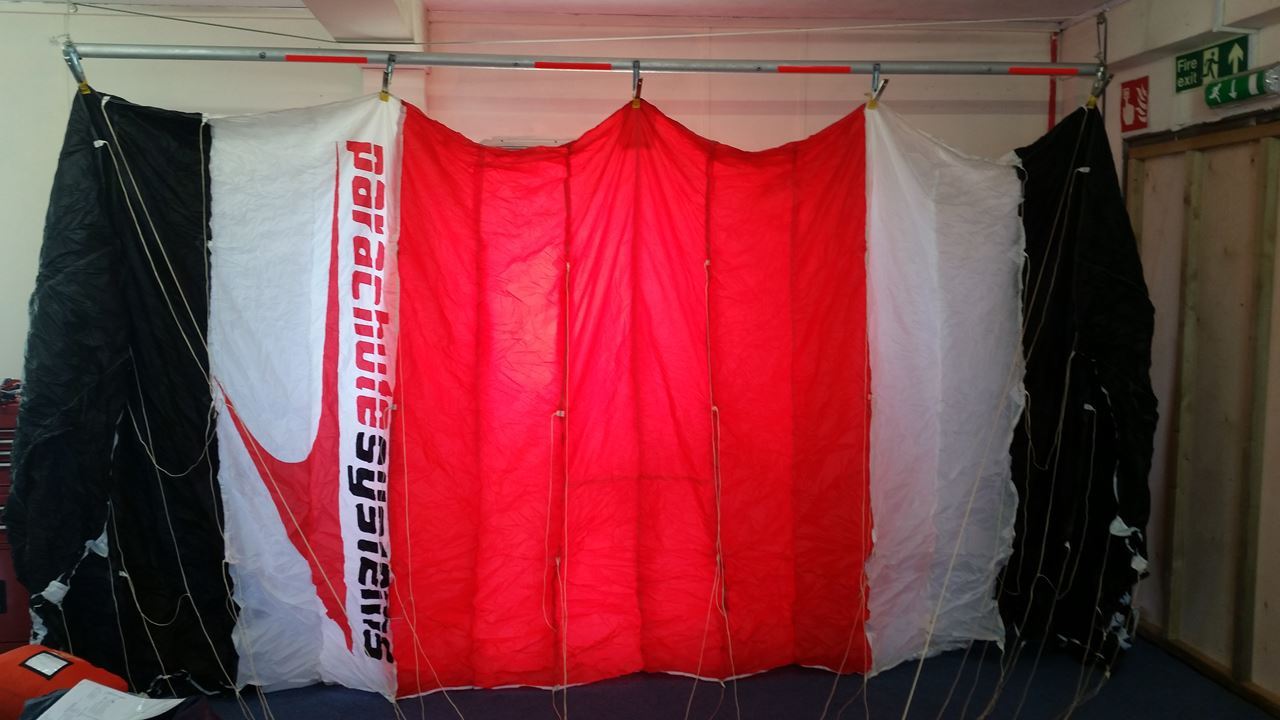
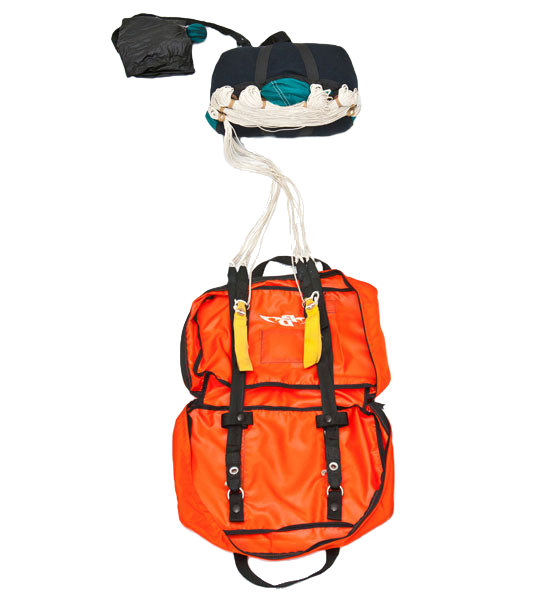
D-bag, bridle, kill line, PC, handle
Check the material and stitching of the d-bag and everything attached, including the bridle, grommets, attachments points for pilot chute (PC) and bridle, and bungees. Change any bungees that aren't perfect and remember to keep it symmetrical. Hold the PC up as a full circle with the netting facing you, handle on the other side, with a light source behind it. When you look at the PC, you can check the condition of the netting (pulls/wear), and also the condition of the material on the other side. The backlight means any holes or material pulls will be easier to spot.
The kill line runs inside the bridle: check that the window still has colour when the PC is cocked, check the condition of the line inside the PC and the attachments to the handle.
Check the handle for signs of wear: the handle itself and the attachment point inside the PC.
 ---
---
All these checks may seem like overkill, but this extra maintenance is only once a month, and they may catch something before problems arise and you have to spend more money to fix them (or end up in a dangerous situation in the sky). Incidents are likely to occur due to complacency. Check after check after check creates a chain of safety, and the earlier something is spotted, the earlier it can be fixed.
We perform similar checks during our inspection and valuation services for rigs and canopies if you're looking to sell your gear. Please note, this article has been created for information purposes only, it doesn’t replace any formal or practical training. If you are keen to learn more, chat to your rigger or packing friends, or get in touch and join us while we perform monthly maintenance sessions on our own gear. Bring your own kit or just watch and join in with ours.